Tutorial: fake quality and new way of shading in Photoshop by Tia E.
Hello everyone!This time I bringing tutorial...It's my first time so I hope you'll be sastified with it .
For tutorial you need:
-Photoshop (GIMP is really similar so I think you can use GIMP for tutorial too)
-IGotTheLook - photoshop action for HQ
-Basic knowledge in Photoshop
-You can use my picture for tutorial.Get it here.
- - - - - - - - - - - - - - - - - - - - - - - - - - - - - - - - - - - - - - - - - - - - - - - - - -
1.
Open photoshop.Open image.Duplicate layer.
2.
Choose brush (that fuzzy) and choose brush size.
Then click Q on your keyboard and draw on face like I on that picture.
When you finish click Q again.You will get this:
3.
4.
Go to Select>Inverse
5.
Go to Select>Modify>Feather
6.
You can choose between 2-5.I choosed 4 and I think it looks fine like that.
7.
Go to Filter>Blur>Gaussian Blur
8.
Choose how you like!
Do the same thing (step 1 - step 7) to the neck...But carefuly , don't choose whole neck only dark parts.
9.
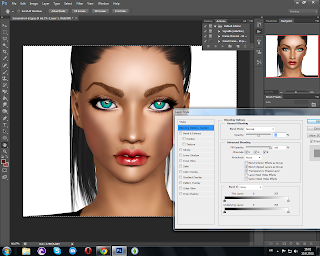
Now we want to accentuate cheek bones what we messed with gaussian blur.
Add new layer.Draw brown lines on cheek bones .
10.
Go to filter>blur>gaussian blur.
Choose how do you like.
11.
Choose blending options.
12.
Choose how do you like on opacity.
13.
Most importantly thing if you want to get your sim realistic with editing is this one...
Choose burn tool.Put exposure to 12-15.
14.
Try to do like I do on this picture.
Draw on cheek bones.Draw on face edges.
Draw on neck edges.Draw on vessels edges.
15.
Add new layer.Choose light skin colour and draw like I on this.
Go to Filter>Blur>Gaussian Blur
Go to Blending options and choose how do you like.
16.
Flatten image.
17.
If you don't have actions in your PS window go toWindow>Actions
18.
Choose HQ Touch from Actions menu.(Link for download is on top)
19.
Choose like I do :) 0,4 - 0,6
END!
You need to get something like this. :3
What do you think?
Also borders of t-shirt just select with lasso tool and than paint with colour of shirt.
I hope I helped you with editing.Feel free to send us your examples of edit and the best edit will won something :) (sirenitysims@live.com)
UPCOMING TUTORIALS:
-Hair drawing - new really easy way in PHOTOSHOP.
-Makeup applying on your sim in PHOTOSHOP.
If you want some tutorials ask us too <3
Love ya,Tia <3


:) Thanks for tutorial :)) Nice work.
ReplyDelete